> For the complete documentation index, see [llms.txt](https://setup.livereach.ai/llms.txt). Markdown versions of documentation pages are available by appending `.md` to page URLs; this page is available as [Markdown](https://setup.livereach.ai/installation-guide/placement.md).

# 2. Plan camera placement

Choose wall positions that preserve a clear side view of vehicles and the gap between them.

## Before you start

Bring the site sketch and review a normal wash from a safe location. Note the highest spray or wash-down line on the wall, moving brush positions, and changes in light at the entrance and exit.

## Apply all five placement requirements

| Requirement                                    | What to look for                                                                         |
| ---------------------------------------------- | ---------------------------------------------------------------------------------------- |
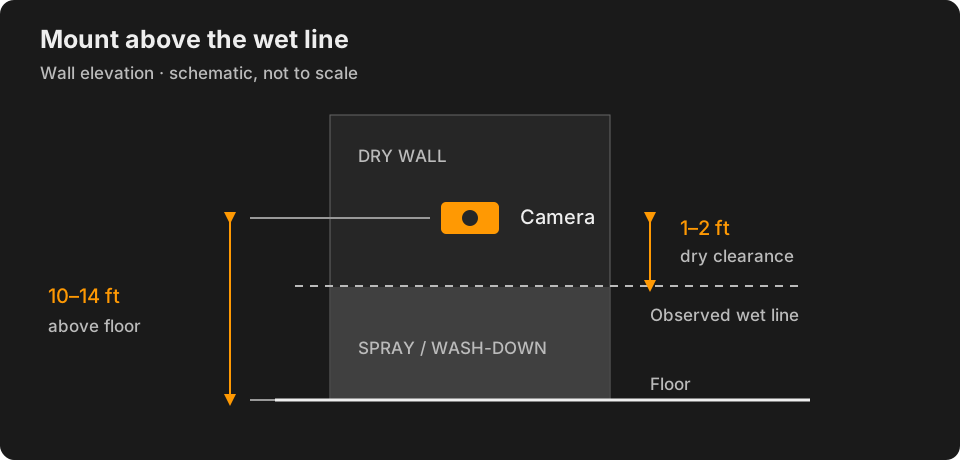
| **10–14 ft above the floor**                   | Measure mounting height from the floor. The whole vehicle side profile must fit in view. |
| **1–2 ft of dry clearance above the wet line** | Use the observed wet line, including normal spray and wash-down exposure.                |
| **Wall mounted**                               | Choose a wall position, not the ceiling above the lane.                                  |
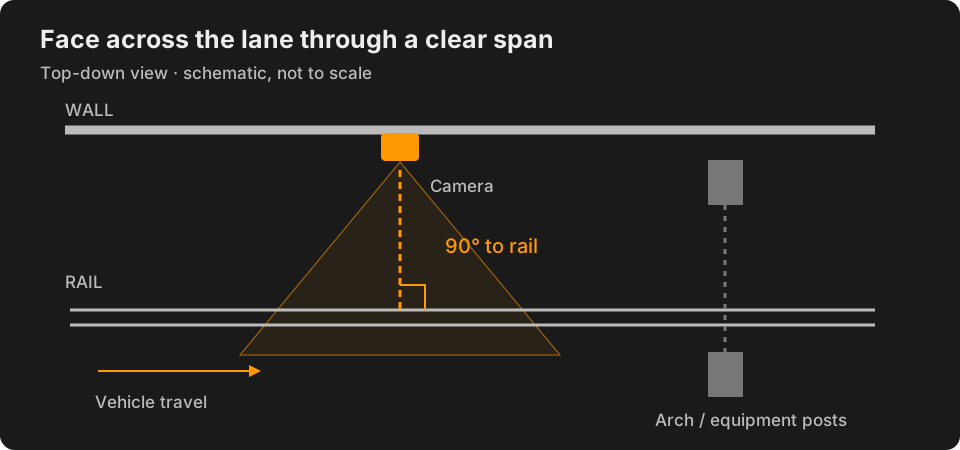
| **Perpendicular to the rail**                  | Face across the lane at 90° in plan view, so vehicles are seen from the side.            |
| **Before the arch or in line with the brush**  | Avoid centering the view on the post that supports the equipment.                        |

<figure><img src="https://3748104918-files.gitbook.io/~/files/v0/b/gitbook-x-prod.appspot.com/o/spaces%2Fcfh08s1E8Fn9MOdqduSf%2Fuploads%2FNqCEJDJOB66khRi7XaD0%2Fmounting-height.svg?alt=media" alt="Wall elevation: camera mounting height is 10 to 14 feet from the floor, with 1 to 2 feet of dry clearance above the observed wet line."><figcaption><p>Both height and dry clearance must be satisfied. Schematic, not to scale.</p></figcaption></figure>

{% hint style="warning" %}
**The requirements apply together.** If a position cannot meet the height, dry clearance, wall-mounting, angle, and coverage requirements, choose another position or ask LiveReach for a placement plan before final mounting.
{% endhint %}

## Check the field of view

{% stepper %}
{% step %}

### Aim across the rail

Position the camera on the wall and face it perpendicular to the rail. Adjust the vertical aim to include the full vehicle side, from roofline to tire contact with the floor. Do not aim along the lane to compensate for an unsuitable position.

<figure><img src="https://3748104918-files.gitbook.io/~/files/v0/b/gitbook-x-prod.appspot.com/o/spaces%2Fcfh08s1E8Fn9MOdqduSf%2Fuploads%2Fdzy83ayZwl6L0w8uewOj%2Fplacement-plan.svg?alt=media" alt="Top-down schematic showing a wall camera facing perpendicular to the rail, with a clear view before an equipment arch. The camera is offset from the arch post."><figcaption><p>Look across the lane through a clear span. Schematic, not to scale.</p></figcaption></figure>
{% endstep %}

{% step %}

### Keep the vehicle gap visible

Check the rear of the leading vehicle and the front of the following vehicle together in the same camera view. Review the closest following distances that occur during normal operation, especially near the entrance and exit. Do not create a close-following condition for this check.

Choose the number and spacing of cameras from actual coverage. Walk through the planned views on the site sketch so a gap does not disappear between adjacent coverage zones.
{% endstep %}

{% step %}

### Check equipment and lighting

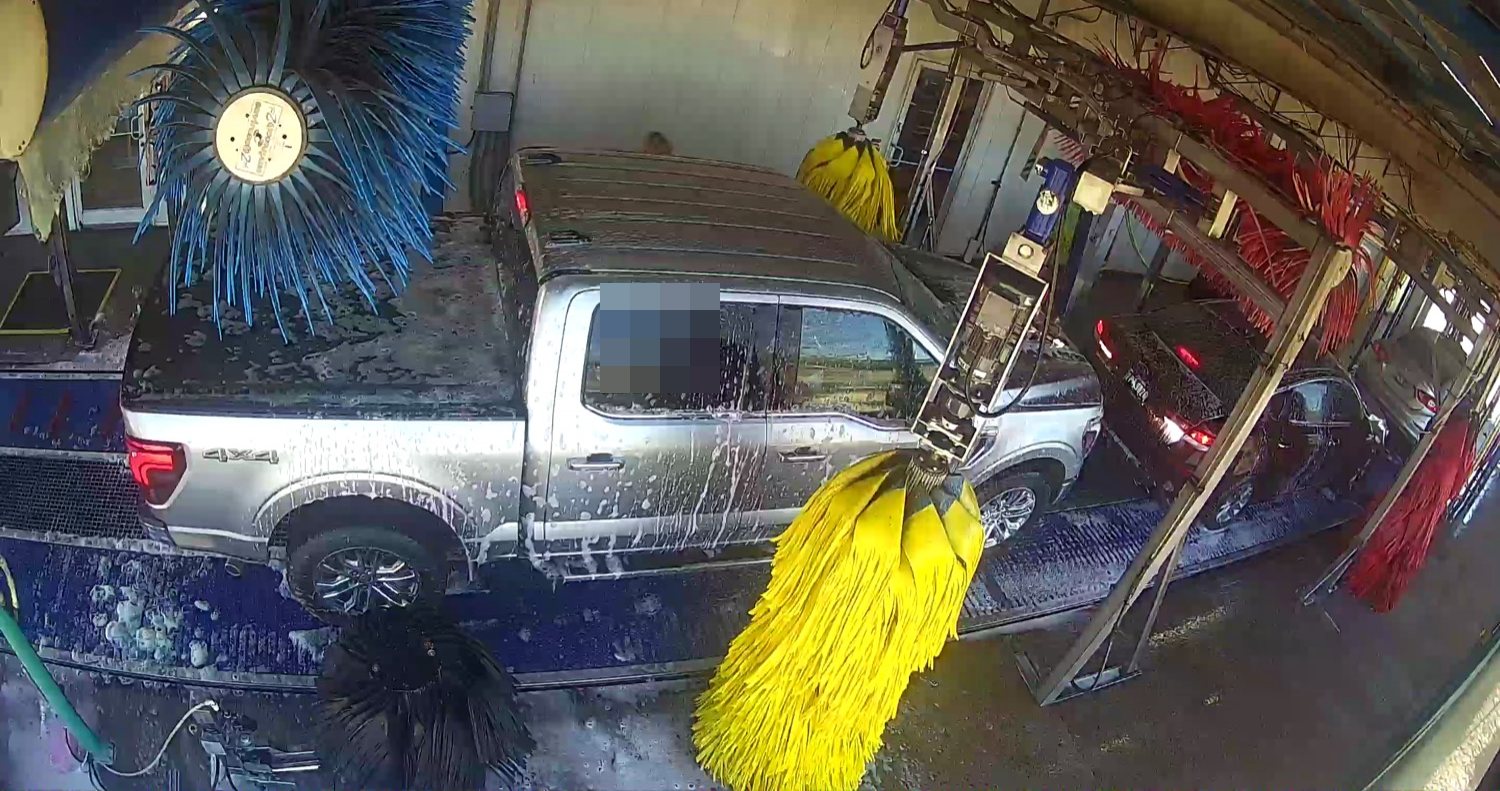
Review the view as brushes and other equipment move. Prefer positions with the clearest, longest view of the vehicle and gap. Check direct lights, bright windows, backlit doors, reflections, and spray on the lens. A clear view with the wash idle may be blocked during a wash.

If equipment hides the required vehicle edges, move the camera or revise coverage with LiveReach. A region of interest can exclude an obstruction from analysis; it cannot reveal what is behind it.
{% endstep %}
{% endstepper %}

## Learn from a field view

<figure><img src="https://3748104918-files.gitbook.io/~/files/v0/b/gitbook-x-prod.appspot.com/o/spaces%2Fcfh08s1E8Fn9MOdqduSf%2Fuploads%2FYxObCJnurQvP0OeR7yTc%2Ffield-obstruction.jpg?alt=media" alt="Wash-tunnel camera frame with a pickup partly crossed by brush equipment and a support assembly."><figcaption><p>Inspection example: brush equipment crosses the vehicle side. Review the full pass to find when the vehicle edges and gap become hidden. This frame alone does not establish acceptable placement.</p></figcaption></figure>

## Check before continuing

* [ ] Every planned position meets all five placement requirements.
* [ ] The full vehicle side and the relevant inter-vehicle gap remain usable in the planned views.
* [ ] Brush movement, posts, glare, and spray have been considered.
* [ ] Proposed positions and coverage are recorded on the site sketch.

**Next:** [Connect the network →](/installation-guide/network.md)